15 Tips For Security Checkpoints
GETTING THROUGH SECURITY FAST
The savviest of travellers understand the security requirements and plan ahead. It’s best to be well organised.
In the United States, airport security is run by the Transportation Security Administration, a division of the Department of Homeland Security, which oversees border security as well as technological research, response to national disasters and terrorism, and intelligence analysis.
Tip #1: Pack accordingly
The TSA has a simple and straightforward list of items prohibited in carry-on and checked baggage.
Loaded guns, ammunition, flares, spray paint, and other highly flammable items must be left at home. (For an amusing weekly round-up of ridiculous items people try to slip past security, check out the TSA blog’s Week in Review.)
A number of items, including knives, spear guns, hammers, and brass knuckles, may be packed in checked luggage, while common lighters, scissors (4 inches or less), small compressed gas cartridges, and short tools (7 inches or less) are allowed in carry-on baggage.
Tip #2: Pack neatly
Assume that security will need to open your bag for a visual inspection. Pack items in layers, with shoes in one layer, clothes in another, and electronics in another, and so forth.
Wind up electronic cords and secure them with twist-ties. Places personal items like toothbrushes in plastic bags to reduce the chance a TSA screener will handle them.
Tip #3: Dress like a traveller
Wear easily removable shoes (gel inserts are permitted), and don’t wear clothing with a high metal content. Leave the belts and thick metal jewelry at home.
Shed jackets and coats, as they must go through the x-ray. If you travel with a laptop, invest in a TSA-approved case that doesn’t require the computer to be removed for screening.
Keep your government-issued ID and boarding pass in a convenient bag or jacket pocket.
Tip #4: Stock up on 3.4 oz bottles
The TSA limits the amount of liquids that travellers may carry through a security checkpoint. Remember “3-1-1”:
3.4 oz (100 mL) bottle or less for all liquids, gels, and aerosols; placed in a
1 quart-sized, clear, plastic, zip-top bag to hold all small bottles; and
1 bag per passenger placed in a screening bin.
Stick deodorant is not limited to 3.4 oz, but gel and spray deodorant are.
As of this fall, snow globes are allowed in carry-ons if they appear to contain less than 3.4 oz of liquid (approximately tennis ball-sized) and the entire snow globe, including the base, can fit in a quart-sized bag. Larger quantities of liquids, gels, and aerosols may be packed in checked baggage.
Tip #5: Check your lunch box
Solid foods are allowed through security, but check this list for prohibited items, which includes liquid-like items such as jams, jellies, syrups, oils, and sauces, if in a container larger than 3.4 oz.
Baked goods like Grandma’s homemade apple pie are allowed through the security checkpoint, but they may be subject to “additional screening.”
Tip #6: Understand Advanced Imaging Technology
In 2007, some airport checkpoints began replacing or supplementing metal detectors with Advanced Imaging Technology (AIT), which resembles a pod that travellers step into and stand, arms raised, as the unit emits harmless electromagnetic waves or x-ray beams to create an image identifying hidden metal objects.
The waves emit less energy than a cell phone transmission or the exposure of two minutes on an airplane.
The image, which is a generic human outline unidentifiable as you, is reviewed and, if passed, immediately deleted. The entire process takes less than one minute and is optional; travellers may opt instead for a metal detector or a pat-down.
Tip #7: Use your queue time wisely
Start getting ready for the screening while waiting in line.
Collapse strollers, remove laptops from non-TSA-approved bags, and take off shoes, belts, and jackets. When you get to the x-ray conveyer, immediately grab bins and begin emptying your pockets and stacking your belongings neatly.
Remove your belt, watch, thick jewelry, money, keys, and cell phone. The more you can “walk and unpack,” the more you’ll help move the line along. Feel free to ask a security officer for assistance in putting your items on the x-ray belt.
Tip #8: Prepare the children
TSA screens everyone, regardless of age, so prepare your children to go through the security checkpoint. Explain that they’ll get their favourite blanket or toy back in a minute, and put all belongings, including strollers and baby carriers, through the x-ray machine.
Children under 12 may leave their shoes on. TSA security will never separate you from your child, but children who can walk without assistance should walk through the detector separately.
If they set off the alarm, they will be allowed to walk through again before security resorts to a pat-down. If the child requires a mobility aid like a wheelchair or scooter, you are responsible for removing the child from the equipment.
Tip #9: Prepare the elderly
Travellers over the age of 75 do not need to remove their shoes for screening. If they set off the alarm, they will be allowed to walk through again before security resorts to a pat-down.
If you are traveling with a disability or medical condition, contact the TSA Cares helpline at 855-787-2227, 72 hours before your flight, for information on helpful travel practices.
Tip #10: Don’t joke about serious matters
TSA officers do not react well to travellers who are loud, belligerent, or disrespectful. Don’t joke about the words “bomb” or “terrorist” while going through screening.
Tip #11: Wait to wrap gifts
Wrapped packages are allowed through security, but the security officers may ask to see inside any bag or package, regardless of the amount of ribbon holding it together.
Avoid the disappointment of a ruined wrap job being by waiting until you get to your destination.
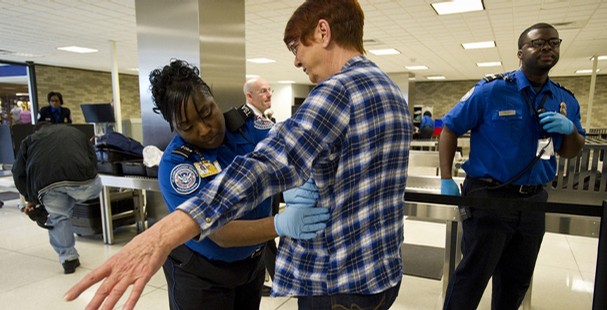
Tip #12: Handle the pat-down with dignity
A small percentage of travellers receive pat-downs as part of the security screening. You have the right to request the pat-down be conducted in a private room and the right to have the pat-down witnessed by the person of your choice.
All pat-downs are conducted by an officer of the same gender as the traveler. If you have a medical device, inform the officer. You will never be asked to remove any article of clothing.
Tip #13: Download the MyTSA Mobile app
We live in the future! The TSA offers a free mobile app with a 24/7 air travel guide as well as information on airport delays, security wait times, videos, and weather.
You can type any item in to the “Can I Bring?” section to get instant answers on whether that item is allowed. To access the TSA mobile app, visit the TSA mobile website on your mobile device.
Tip #14: Sign up for TSA PreCheck
Travellers who register with TSA PreCheck enjoy perks such as keeping shoes, jackets, and belts on, as well as being able to hold standard-compliant liquids and gels in a carry-on bag.
You must be a frequent flyer with American, Delta, United or U.S. Airways, and you must be traveling domestically. TSA PreCheck is currently available in more than 30 U.S. airports, including Chicago O’Hare, Newark, and Orlando. For more information, visit the TSA PreCheck website.
Tip #15: Call the TSA
If you have any lingering questions, call the TSA directly at 866-289-9673. Representatives are available Monday-Friday, 8 a.m.-11 p.m. Eastern time; weekends and federal holidays, 9 a.m.-8 p.m. Eastern time.